Monday, June 6, 2011

In the meantime...

In the meantime, while I am waiting to begin embarking on my journey of making some swiss buttercream and making some really nice core of the cake part of the cupcakes, I am going headed down another road.  Don't worry, this road is headed in the right direction...the direction that we're picking up on in the first place from the last time cupcakes took over my eyes and mind ;-)

I am going to attempt to make Blue Velvet, Blackberry Curd, Blackberry Lemon Cream Cheese Cupcakes.  Where did I get that from?  A friend of mine, made these and had them at a bake sale and they were absolutely delicious & I have to give a try at making them. 

So here goes, last night I went online to try and find what even would look like a similitude of what that recipe might be, and I found this.  These cupcakes were featured on Food Network.  They were done by Cakeology and were one of the cupcakes that won on Cupcake Wars (I "think"... don't quote me on that).  But I know that they were on there.

Long story short, this tells me two things.  Number One: This is a good recipe to try!  Number Two: Cupcake Wars is a good place to start pulling cupcake recipes.  That's what I need and that's the direction I am going in.

So now the plan is two-prong: (1) Make swiss buttercream, and (2)  practice making some really good cupcakes. You ready?

Sunday, June 5, 2011

A couple of other things that I recently bought in my cupcake journey are a hand-held sifter, and an ice cream scooper.  (It looks like a will also have to get an apple corer now for filling the cupcakes).

The Next Step in My Journey

So the next step in my (cupcake) journey is picking up where I left off last year.  "What are the things that I did?"   Back track my steps..and let me start over again.

Well, last year, I:

* Looked into a website called, "Bake It Pretty".com.  Looked over some things, nothing really stood out.
* I also went around to a series of cake and cupcake shops (and also to their sites) and started asking questions.
* Last but not least, I entered a craft fair to sell my cupcakes...but didn't actually end up selling any of my
cupcakes, but rather cupcakes in a jar.  Like these.  In fact, these were the site that I got my recipe from and
I sold some of them there (at the craft bazaar).

But I never took the time to actually perfect the "making" of the cupcakes.  So, here we go.

Picking up from then, the first thing that I did was I went back to my original site where I looked for my supplies at Bake it Pretty.

Second (just last week) I ordered one of those "Best Ever Cupcake Icing" Kits that they have on their site.
Now, let me say that I had (since last year) gotten one of those cupcake kits from Michael's and it never worked for me...or maybe I should say, that "I" never worked it enough, but I think that this one will do.  I do have one of the tips that already comes in this kit but I don't know, it might not be the same size.  Also, this kit offers a 16inch featherweight bag which I don't have. 

The next thing that I did, last year, was I looked around to see what kind of icings were out there from the good bakeries that I'd want to buy cupcakes from.  And the one thing that I found that was the common denominator was somewhere along the lines of a swiss buttercream, if you will.

Now that brings me back to something else.  Last year, my hubby sent me up to a speaking event uptown by a former food Food Network's star, now sucessful cake business owner, Warren Brown.  Well, long story short, I bought his book, Cake Love, got it autographed, took a picture with him and took the book home to then, literally eat it up!  I was facsinated and amazed by his vast knowledge of cakes and how to make them from scratch as well as his recipe for the meringue (icing).  I left off last summer, with saying that I was going to perfect some of his cake recipes (and later incorporate them into my cupcakes).   And honestly, I made one cake and that is where I left off..

It is from there that I will now pick up.

As of today, my Best Ever Cupcake Icing Kit, has officially arrived in the mail!  (It must have arrived yesterday because we all know that mail doesn't come on Sundays:-).  So it's here.  I am excited to open it and see what's it in.  Secondly, I am awaiting my chocolate brown cupcake liners.  I think that all cupcakes, to look professional, must or should be either in a solid black or solid chocolate brown liner.  That's just my thought.  So, I've got my muffin liners on the way-and they should be here soon.  In the meantime, I just need to get a handle on what's in the bag (from Bake It Pretty) and then next move on to making my cupcakes and swiss buttercream, and then the actual icing of the cupcakes...that is the area that I have failed in the past.

I am taking this slow because I want to be complete and finish my course.  So in case you got lost, the next step is opening my best ever kit, getting my liners, and heading to the icing.

This all takes courage but I believe that I can do it.

Sweet dreams,
Chemeeka

Wednesday, June 1, 2011

What happened to My Dream???

A year ago, right about this time last year, the Lord had put it in my heart to start making cupcakes again & professionally.  Back when I was a teenager in high school, my dad and I would make cupcakes for community events...like 100-300 cupcakes per event.  Well years and years later, the youth pastor and worship leader at our church got on the microphone during on Sunday morning service and said, "he felt like there were people in the room that had allowed their dreams or something that they were believing for to die but that that dream could be ressurected and re-realized."  And that was me.  I felt like for days and days God had been speaking to me about cupcakes and doing them again...not to mention the at-the-time (Summer 2010) upcoming and very popular two new shows to about cupcakes on tv (DC Cupcakes on TLC and Cupcake Wars) on Food Network.  Between these two shows, I felt very inspired.

I told my husband about it and last August he found and sent me to a Chamber of Commerce event uptown where Warren Brown of Cake Love would be speaking.  So I went, I bought the book, had it signed and autographed. Talked to him about how he got into cakes and tried to take from there.  Afterward, I thought that if I took his book and studied it and began making those cakes, (how to make cakes from scratch) I could master a few of those recipes...you get the point.

Well anyways, a few days ago I went to a church picnic and there they were, someone had brought in cupcakes and my dream that had been forgotten all came back.  "What have I been doing all this time?!"   I thought to myself.  I had not been working on my cupcakes.  I had not been perfecting my recipes.  And in fact where last year I had put my services for making cupcakes up online for a low cost I allowed myself to get side-tracked in doing cakes, and shower cakes.  Not that those aren't good, but "whatever happened to my cupcakes?"   I have to do this.  I have to take this up again.  I have to allow
my dreams to be good (and to make good) cupcakes come to life!  I have recipe ideas that I have come up
with that are original to me, a year ago that are ready to be made.

And I am going to do them all here.  So what do you say, are you ready to follow me on this journey?

Sunday, April 10, 2011

This one's new to me (The Sugar Baby Cookbook)

Sugar Baby: Confections, Candies, Cakes & Other Delicious Recipes for Cooking with Sugar

This one's new to me!  I just ran across it when I was searching for something (else) on one of
my favorite sites, and what do you know...there's another yummy cookbook out there.

Gotta check it out!

Thursday, April 7, 2011

I used my Stand-Mixer for the first time (today)!

Okay so, I have finally moved my Kitchen-Aid stand mixer from this spot....
To this one!
I have had it now for a few months (since Christmas actually) and it's time
to dust this baby off, and get a move on!
"Well, let's see...how does this bowl go on?"
Got it!  Okay, since I was already starting to make this cake today, (by habit) in my usual blue bowl (and by hand I might add) I decided, "hey, why not use the stand mixer?" 
So I poured everything into my mixer's bowl.

...brought it on over to my mixer..."up...that's not going to fit.."
Okay, so then I took off the attachment and put the bowl underneath.
Then I added the attachment...
Hit the start button :-)
Oh, wait, no start button yet.  First, I had to raise the bowl. 
I raised the bowl, then I hit the start button (it's actually a lever I pulled on the other side.  I'll show that to you later).
See there it is.  It guages from low to hi and (sorry it's not clear)
ranges from Speed 1 to 10.
And it's a Kitchen Aid.

And it's a mixin'...
See my video?  I'm really excited :-)
And we mixed.  When I was done I lowered the level of the bowl
with this handle (the same one that I used to bring it up).
Then I unplugged it.  (I don't know if you have to do this step, but I didn't want to take any chances with having to remove the mixing attachment, next).
Then I removed the mixing attachment.
Shook it off...
Took my bowl out.
And poured it into the pan.  How fun!  (My pan was greased off course :-)

  This was really fun taking it from the old school way that I have been doing it for so long to finally coming into the modern Era with my stand-mixer.
Yippee!


Wednesday, April 6, 2011

Just in case you missed it (Pinkies for Cakies)

Taken from my Pinkies for Cakies post:

In the famous words of my 2 year old daughter, "de-yish-ous, Mama!"  Whether it's a little frosting on a spoon or a little piece of chicken, if she likes it, she yells..."de-yish-ous!"  And that it is:-)  At least that's what I am saying about my yummy little "pinkies" that I made for Rubyellen of Cakies.  These treats were absolutely yummy.  I would know, I ate 'em.  Yikes!  Didn't mean to do that..but that's what happens when you're a food blogger...no less a dessert blogger.  And to make matters worst, when you're a dessert blogger with a sweet tooth like myself, it makes the journey should I say...delicious.  So, I have come up with a little solution for my "problem" if you will.  So that I can continue to fit into my clothes, but yet still be able to sit down ...
Grab a fork and enjoy something yummy.  A virtual fork that is.  I sit reminisce on this treat that I made without edibly enjoying all over again.  Wanna join me?
(And yes, it really did taste as good as it looks).  Check out the recipe here and you could be serving this after dinner tonight!

Banana Caramel Pie

This is one of those really yummy, really easy, no-bake pies that I made a while back.  It's got three fairly easy steps.  All in all, this pie is about a two-day process...not two whole days, but...you'll see. 

Ingredients
* one can sweetened condensed milk
* two medium (almost ripe) bananas
* a graham cracker crust
* one cup whole milk
* one teaspoon salt
* half cup granulated sugar
* one teaspoon vanilla extract
* 1/8 cup all-purpose flour
Whipped Topping (optional)
Let's get started.  Day One:To make your caramel take one 14-ounce can of sweetened condensed milk, remove the label.
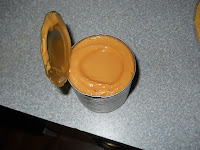
 And set in a 3-quart sauce pan (completely covered with cold water) and cover.  Bring it to a rolling boil and you want to hold that boil for 2 straight hours.  Periodically, you'll need to come back and check on this and make sure that you're not running out of water.  If so, just add a cup (or however much is needed) warm water.  Really, really important note (especially if you have kids....: Please, pretty please by all means, DO NOT leave this to boil on the front burner.  It may look enticing to little eyes...especially since you'll be leaving it to boil for 2 hours.  Use the back burner to boil. Always!)(Use warm water for refilling because you've already reached the initial boiling point and we don't want to have to start over from scratch by adding cold water. Kay?;-)  Once your can has completely boiled for the full two hours, turn the heat off and leave it in the pot for about an hour, until you can safely handle it without scolding your fingers.  Once it's set there for a while, remove it from the water and let it sit on the counter on a dish towel to come to room temperature.  Before you got to be for the evening put your can in the fridge.  It will be ready to go after having cooled in temperature overnight.
Day Two: Take out your graham cracker crust and remove the label, so that you're ready to go. 
If you open up your can from yesterday, you'll see that you have a beautiful brown caramel.  Now, let's layer that into our graham cracker crust.  Go ahead and use the whole can.  This will make a really nice layer in the bottom of our pie.
Next, slice one medium (almost ripe, not too ripe) banana and arrange the slices
on top of your caramel. 
Set your pie aside.  Now, were going to work on our custard.

In a small bowl, combine your salt, sugar and flour and then add to your your milk in a medium saucepan.
Bring it to a boil. 
Separate out one egg yolk.  Once you beat the egg yolk, slowly temper your custard into your yolk.

Mash one banana.
Return your custard back to the pot and add your banana to it.
 Once you've stirred that for a while and cooked it over the heat, add one and half teaspoons of vanilla and a pat (one tablespoon) of butter.
Continue to cook for four to five minutes and then remove the pot from the heat and let the custard set for about 20-25 minutes.  After it sets, cover your layer of bananas with this custard.


Okay, so I wasn't totally happy with the result.  My custard turned out a bit too clumpy.  This blog is about sharing my cooking and baking journey with you...and this recipe serves as one of the mistakes that I've learned from.


Ripe, almost ripe bananas are too mushy for this custard.  Besides the fact, a banana flavoring, which would have not changed the consistency of the custard would have been better.  Nonetheless, whether you make this recipe with the custard "my way" or the way that I've suggested in my critique, this flavor profile is sure to be (sweet) and delicious!  Give it try, and let me know how you do. 

Happy Pie Making...Bakie.


Friday, April 1, 2011

The Perfect (Boiled) Egg

These are our eggs, fresh eggs, eggs from our chickens.  This recipe was passed down to me from my mother-in-law (although my husband says that he gave it to her..nonetheless it was share with me).  Some of you may already know this trick but just in case you don't I thought I'd pass this along as I am making devilled eggs today for company later on.

The Perfect (Boiled) Egg
Items Needed

Eggs
Pot (for water)
Cold water
A stovetop

Put your eggs in a pot with cold water.  Set on the stove to boil and bring to a boil.  Immediately after the eggs have come to a boil, leave them in the pot but turn them off and let them sit in the water for exactly 15 minutes.  After 15 minutes, take them out of the pot and run a little cold water over them.  And voila!  You have your Perfect Boiled Egg!